


Cruiser Worx
Toyota Land Cruiser Prado 120, Lexus GX 470 2002-2009 Floor Mats — Precision Fit EVA
Toyota Land Cruiser Prado 120, Lexus GX 470 2002-2009 Floor Mats — Precision Fit EVA
Couldn't load pickup availability
Precision-Fit EVA Floor Mats – Toyota Land Cruiser Prado 120 & Lexus GX 470
Precision-fit EVA floor mats bespoke to the Land Cruiser Prado 120 and Lexus GX 470 (2002–2009), available in both Right-Hand Drive (RHD) and Left-Hand Drive (LHD) configurations. Laser-patterned to the factory floor for full coverage, these mats trap dirt, mud, sand and water and lift out in seconds for a quick rinse — ideal protection for a hard-working overland or daily-driven rig.
Choose Your Coverage
- Front Only — driver & passenger front mats
- Front & Rear — complete 5-piece set (two front mats, two rear mats and a centre tunnel piece)
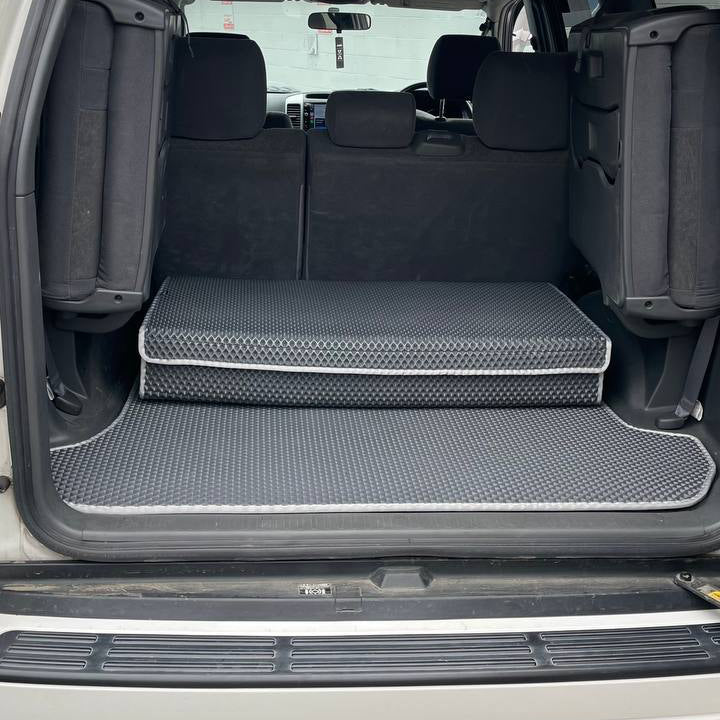
- Trunk / Cargo Only — rear cargo-area mat
Choose Your Colours
Build your set from two selections:
- Mat Style: Gray Diamond (Large), Black Diamond (Large), Black Diamond (Small), Brown Diamond (Large), Beige Drop, Black Drop, Black Honeycomb
- Trim / Edge Colour: Black, Red, Grey, Orange, Dark Blue/Navy, Yellow, Light Blue/Sky Blue, Light Green, Pink
Features
- Lightweight, durable EVA — flexible, 100% waterproof and easy to clean
- Raised textured surface traps debris and liquids
- Precision-fit to your vehicle — bespoke to each model and drive configuration
- Designed and made in Canada
- 1-year warranty
Fitment
Fits the following vehicles — please select your drive configuration (RHD or LHD) at checkout:
- Toyota Land Cruiser Prado 120 (2002–2009) — RHD & LHD
- Lexus GX 470 (2003–2009) — RHD & LHD
Unsure if these mats fit your specific variant or trim? Contact us before ordering and we'll confirm the correct fit for your vehicle.
Made to Order
Each set is made to order for your vehicle and colour choice. Please allow 3–5 business days to ship. The photos shown are of our actual vehicles.
Installation Instructions
Reshaping after shipping
Your mats may arrive slightly misshapen from packaging and shipping. Gently warm the affected areas with a hair dryer, keeping it moving to avoid overheating, then shape the mat to fit the floor area.
Installing anti-slip mounts
Your mats may include user-installed anti-slip hooks or round screw-in mounts. Follow the instructions below for the fittings supplied with your mats.
Twist-lock tabs and hook bases
- Position the mat exactly where you want it in your vehicle.
- Apply light pressure around each black locking tab, then carefully turn the tab 90 degrees to release it from the mat.
- Lift the mat out carefully, leaving the mounting hooks in position.
- Outline the perimeter of each hook base with painter’s tape to mark its position.
- Place the hook base at the rear centre of its taped outline. With controlled downward pressure, push the hook through the carpet.
- Slide the hook base forward, towards the engine, until it sits correctly within the taped outline.
- Remove the tape, refit the mat and secure the locking tabs.
Round pin / screw-in mounts
- Position the mat correctly. Place a piece of painter’s tape beneath each mounting point, then press the point through the tape to mark its location.
- Unsnap the pointed screw mount from the mat.
- At the marked position, apply controlled downward pressure to pierce the carpet, then screw the mount in.
- Before the mount is fully seated, carefully remove the tape without moving the mount. Back the screw out slightly if needed to release the tape, then tighten it fully.
- Refit the mat and press the round fitting onto the mount until it clicks into place like a button.
Before driving: Check that the mat is securely attached and cannot interfere with the accelerator, brake or clutch pedals. Check beneath the carpet before piercing it, and do not force a fitting into an area where it could damage wiring or other components.
Cleaning and care
Clean with mild soap and water. For ground-in dirt, use a bristle brush to gently scrub the affected area.
Do not use a pressure washer, as it may damage the mat’s finish.
Share


Not sure it fits your truck?
Send us your VIN or chassis code (e.g. HZJ80) and we'll confirm fitment before you order.